在大数据渲染中,我们往往会考虑
缓存、分页、虚拟列表方式优化大数据量渲染,通常我们会用已有的现成插件比如umy-ui(ux-table)虚拟列表 table 组件,vue-virtual-scroller以及react-virtualized这些优秀的插件快速满足业务需要。
为了理解插件背后的原理机制,我们实现一个自己简易版的虚拟列表,希望在实际业务项目中能带来一些思考和帮助。
正文开始...
虚拟列表是什么
在大数据渲染中,选择一段可视区域显示对应数据。
我们先初步看一个图 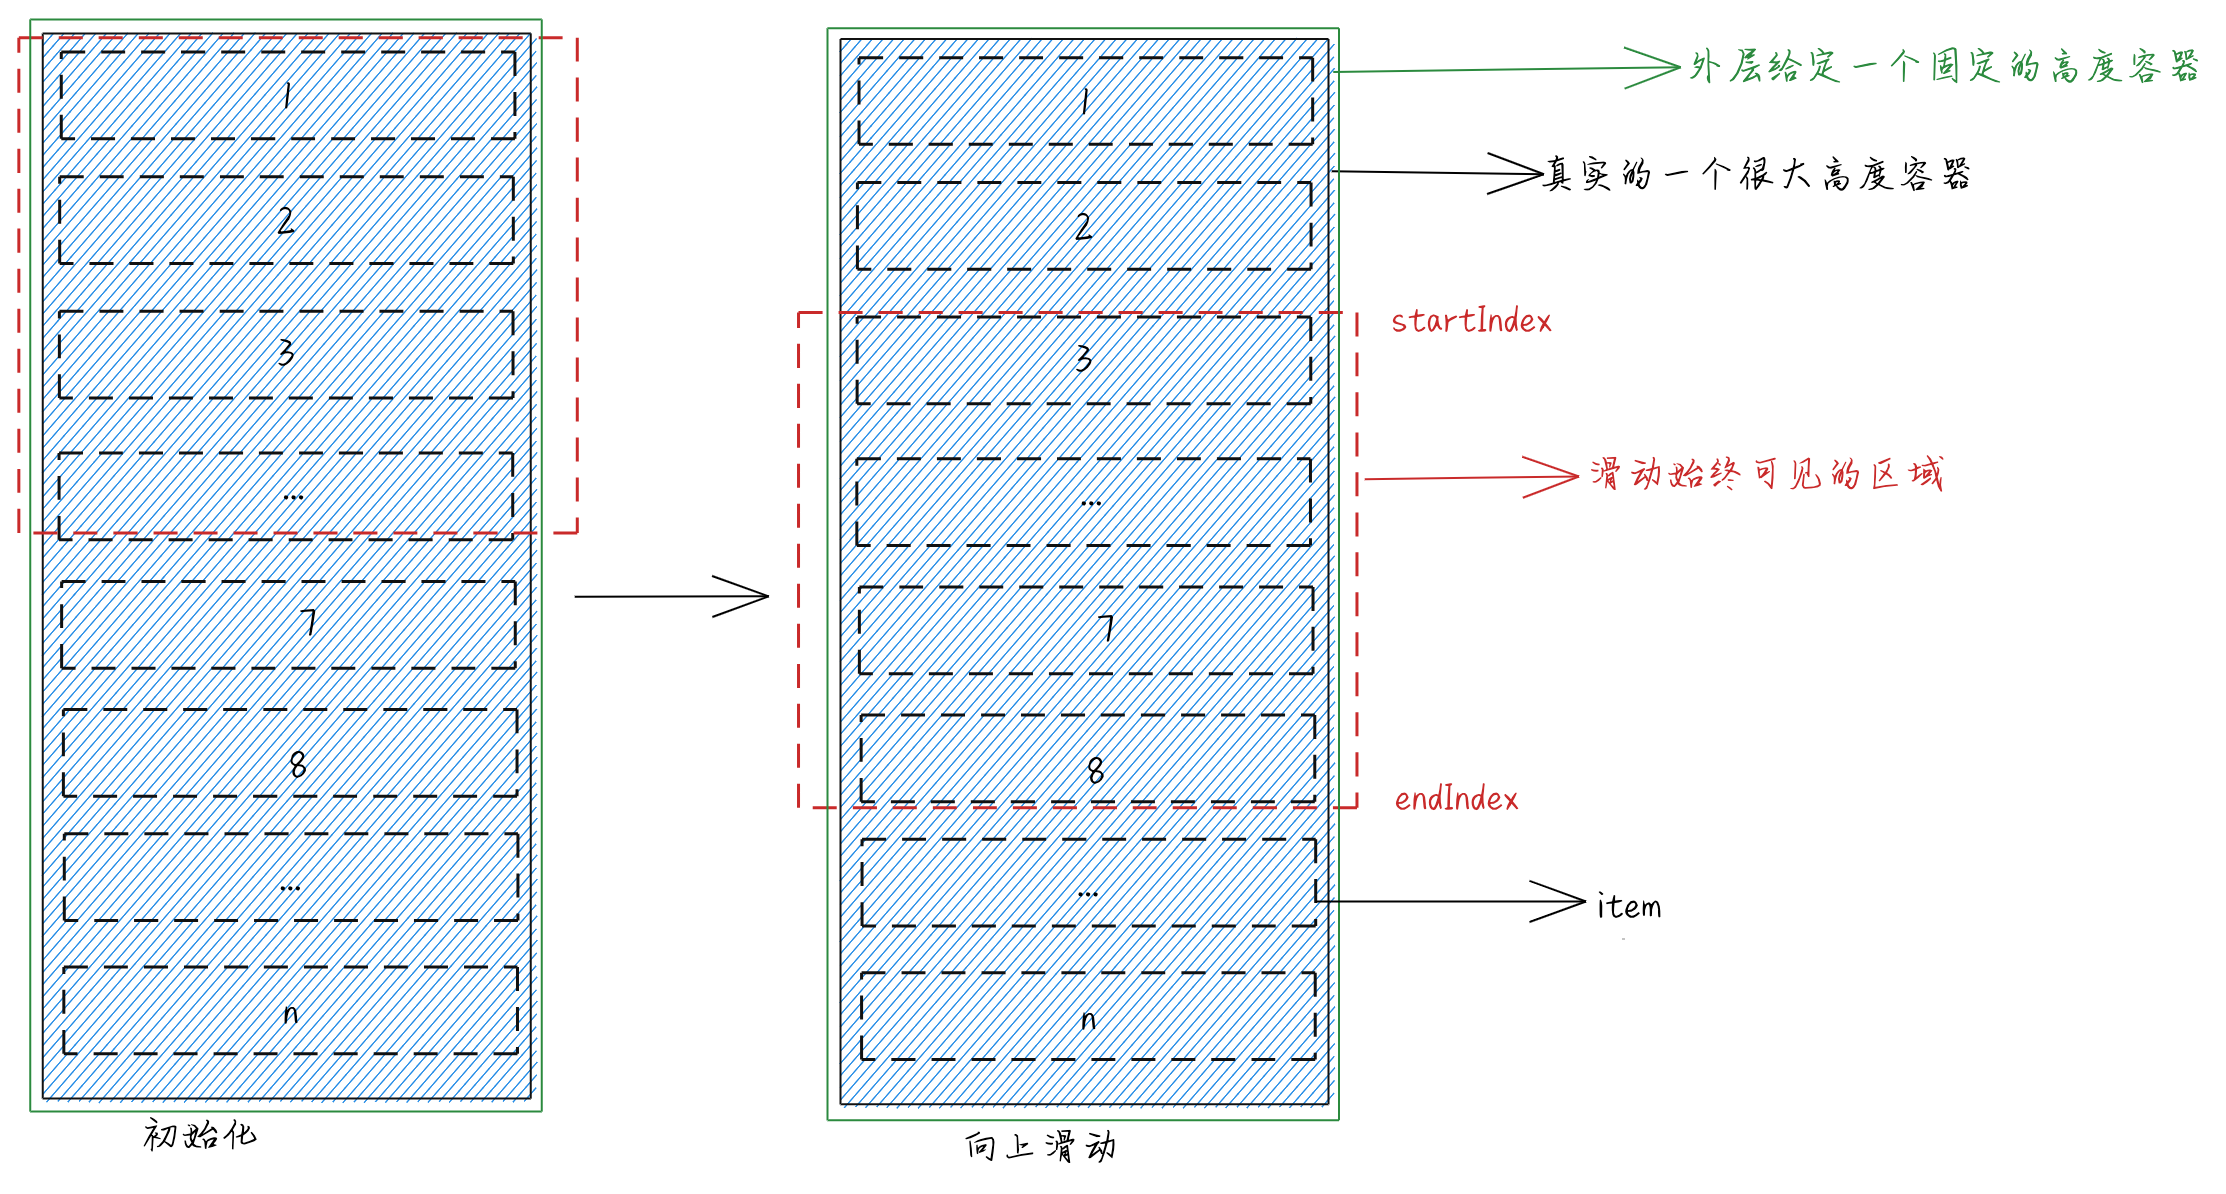
在这张展示图中,我们可以看到我们展示的始终是红色线虚线展示的部分,每一个元素固定高度,被一个很大高度的元素包裹着,并且最外层有一个固定的高度容器,并且设置可以滚动。
新建一个index.html对应结构如下
...
<div class="vitual-list-wrap" ref="listWrap">
  <div class="content" :style="contentStyle">
    <div class="item" v-for="(item, index) in list" :key="index" :style="item.style">{{item.content}}</div>
  </div>
</div>
对应的css
* {
  padding: 0px;
  margin: 0px;
}
#app {
  width: 300px;
  border: 1px solid #e5e5e5;
}
/*外部容器给一个固定的可视高度,并且设置可以滚动*/
.vitual-list-wrap {
  position: relative;
  height: 800px;
  overflow-y: auto;
}
/*真实容器的区域*/
.content {
  position: relative;
}
/*固定高度的每个元素*/
.item {
  height: 60px;
  padding: 10px 5px;
  border-bottom: 1px solid #111;
  position: absolute;
  left: 0;
  right: 0;
  line-height: 60px;
}
从对应页面结构与css中我们的思路大致是这样
- 确定外层固定的高度,并且设置纵向滚动条
- 真实容器设置相对定位,并且根据显示总数动态设置一个装载容器的高度
- 每个元素设置绝对定位,且是固定高度
有了对应设置的结构,因为我们每个元素是绝对定位的,所以我们现在的思路就是:
1、确定可视区域item显示的条数limit
2、向上滑动的当前位置起始位与最后位置,确定显示元素范围
3、确定每个元素的top,当向上滑动时,确定当前的位置与最后元素的位置索引,根据当前位置与最后元素位置,渲染可视区域
具体逻辑代码如下
<div id="app">
  <h3>虚拟列表</h3>
  <div class="vitual-list-wrap" ref="list-wrap">
    <div class="content" :style="contentStyle">
      <div class="item" v-for="(item, index) in list" :key="index" :style="item.style">{{item.content}}</div>
    </div>
  </div>
</div>
<!--引入vue3组件库-->
<script src="https://cdn.bootcdn.net/ajax/libs/vue/3.2.33/vue.global.min.js"></script>
<script src="./index.js"></script>
我们具体看下index.js
// index.js
const { createApp, reactive, toRefs, computed, onMounted, ref } = Vue;
const vm = createApp({
  setup() {
    const listWrap = ref(null);
    const viewData = reactive({
      list: [],
      total: 1000, // 数据总条数
      height: 600, // 可视区域的高度
      rowHeight: 60, // 每条item的高度
      startIndex: 0, // 初始位置
      endIndex: 0, // 结束位置
      timer: false,
      bufferSize: 5 // 做一个缓冲
    });
    const contentStyle = computed(() => {
      return {
        height: `${viewData.total * viewData.rowHeight}px`,
        position: 'relative'
      };
    });
    // todo 设置数据
    const renderData = () => {
      viewData.list = [];
      const { rowHeight, height, startIndex, total, bufferSize } = viewData;
      // 当前可视区域的row条数
      const limit = Math.ceil(height / rowHeight);
      console.log(limit, '=limit');
      // 可视区域的最后一个位置
      viewData.endIndex = Math.min(startIndex + limit + bufferSize, total - 1);
      for (let i = startIndex; i < viewData.endIndex; i++) {
        viewData.list.push({
          content: i,
          style: {
            top: `${i * rowHeight}px`
          }
        });
      }
    };
    // todo 监听滚动,设置statIndex与endIndex
    const handleScroll = (callback) => {
      // console.log(listWrap.value)
      listWrap.value &&
        listWrap.value.addEventListener('scroll', (e) => {
          if (this.timer) {
            return;
          }
          const { rowHeight, startIndex, bufferSize } = viewData;
          const { scrollTop } = e.target;
          // 计算当前滚动的位置,获取当前开始的起始位置
          const currentIndex = Math.floor(scrollTop / rowHeight);
          viewData.timer = true;
          // console.log(startIndex, currentIndex);
          // 做一个简单的节流处理
          setTimeout(() => {
            viewData.timer = false;
            // 如果滑动的位置不是当前位置
            if (currentIndex !== startIndex) {
              viewData.startIndex = Math.max(currentIndex - bufferSize, 0);
              callback();
            }
          }, 500);
        });
    };
    onMounted(() => {
      renderData();
      handleScroll(renderData);
    });
    return {
      ...toRefs(viewData),
      contentStyle,
      renderData,
      listWrap
    };
  }
});
vm.mount('#app');
看下页面,已经 ok 了,每次上滑都只会固定高度加载对应的数据 
注意我们在css中有一段这样的代码
#app {
  width: 300px;
  border: 1px solid #e5e5e5;
  opacity: 0;
}
... [data-v-app] {
  opacity: 1 !important;
}
这样处理主要是为了插值表达式在未渲染的时候,让用户看不到未渲染前的模版内容。如果不先隐藏,那么会打开页面的时候会有插值表达式,vue中提供了一个v-cloak,但是貌似这里不管用,在vue2中是可以的。
本篇是非常简易的虚拟列表实现,了解虚拟列表背后的实现思想,更多可以参考vue-virtual-scroller与react-virtualized源码的实现,具体应用示例可以查看之前写的一篇偏应用的文章测试脚本把页面搞崩了 。
总结
了解虚拟列表到底是什么,在大数据渲染中,选择一段可视区域显示对应数据
实现虚拟列表的背后原理,最外层给定一个固定的高度,然后设置纵向
Y轴滚动,然后每个元素的父级设置相对定位,设置真实展示数据的高度,根据item固定高度(rowHeight),根据可视区域和rowHeight计算可显示的limit数目。当滚动条上滑时,计算出滚动的距离
scrollTop,通过currentIndex = Math.floor(scrollTop/rowHeight)计算出当前起始索引根据
endIndex = Math.min(currentIndex+limit, total-1)计算出最后可显示的索引最后根据
startIndex与结束位置endIndex,根据startIndex与endIndex渲染可视区域本文示例code example
本文参考相关文章如何实现一个高度自适应的虚拟列表,这是
react版本的